
Introduction: The Calm After the Storm
In the aftermath of a hurricane or severe storm in Central Florida, a period of anxious calm settles over communities. The immediate danger has passed, but a new wave of uncertainty begins. For homeowners, this period is often defined by a pressing question: “Is my home safe, and is my roof okay?” The sheer volume of advice from federal agencies, news outlets, and neighbors can be overwhelming, creating confusion when clarity is needed most. This report provides a comprehensive, methodical framework for homeowners to navigate the post-storm environment. It is designed to transform anxiety into an actionable plan, focusing on a critical, unchangeable principle that must govern all subsequent actions:
personal and family safety is the absolute first priority. By establishing a clear, step-by-step process, this guide will address immediate hazards, detail safe inspection procedures, explain damage documentation for insurance purposes, and clarify when to seek emergency professional help.
Your First 60 Minutes: The Immediate Safety Checklist
Before any assessment of property damage can begin, a homeowner must first ensure the immediate environment is safe. The minutes and hours after a storm are fraught with hidden dangers that can be far more threatening than a damaged roof. A study of injuries following a major storm event revealed that a significant percentage of injuries occurred not during the storm itself, but in the rescue and cleanup phase afterward. Therefore, a systematic safety check is not just recommended; it is imperative.
Wait for the All-Clear
The first rule of post-storm safety is to adhere to official instructions. If an evacuation order was issued, homeowners must not return to their property until emergency management officials have declared it is safe to do so. Emergency responders need clear roads to handle the most critical situations, and returning prematurely can impede their efforts and place residents in unnecessary danger from ongoing hazards like flooding or unstable infrastructure.
The Outdoor Hazard Scan
Once it is deemed safe to return to the property, a careful external assessment must be conducted from a safe distance before approaching or entering the home. This initial scan focuses on life-threatening hazards.
- Downed Power Lines: This is the most critical and lethal post-storm hazard. All downed power lines must be treated as live and dangerous. Homeowners should maintain a significant distance and never touch a downed line or any object in contact with it, including fences, ladders, or puddles of water. Standing water can become energized by a hidden downed line, making it a deadly hazard. Any downed power lines should be reported immediately to the local utility company and emergency services.
- Gas Leaks: The sense of smell is a critical safety tool. If a homeowner smells natural gas or propane, or hears a hissing sound, they must evacuate the area immediately. It is crucial not to use any electronics, flip any light switches, or do anything that could create a spark, as this could trigger an explosion. The gas company should be called from a safe distance away from the property.
- Structural Integrity: From a distance, the home’s overall structure should be visually inspected. Obvious signs of severe damage, such as large cracks in the foundation, leaning walls, or missing support beams, indicate the building may be unstable. If the structure appears compromised, no one should attempt to enter until it has been professionally inspected by a building inspector or structural engineer.
- Water and Contamination: Floodwaters pose multiple threats. Beyond the risk of electrocution, standing water is often contaminated with sewage, chemicals, sharp debris, and hazardous wildlife. Homeowners should never walk, swim, or drive through floodwaters.
By focusing this initial section exclusively on personal safety, a foundation of trust and credibility is established. It demonstrates a holistic understanding of the homeowner’s post-disaster situation, where the primary concern is the well-being of their family, not just the condition of their property. This approach, which prioritizes the same critical warnings issued by top-level safety organizations like FEMA and the Red Cross, frames subsequent advice about roofing not as a sales pitch, but as a continuation of a responsible, safety-first methodology. When a homeowner perceives that a company cares about their safety, they are more likely to trust that company’s professional recommendations.
The Ground-Level Walk-Around: How to Safely Inspect Your Property
After confirming there are no immediate life-threatening hazards, the next step is a preliminary property inspection. This inspection must be conducted entirely from the ground. Under no circumstances should a homeowner climb a ladder or get on a roof that may have been damaged in a storm. A compromised roof can be structurally unstable, and wet surfaces are extremely slippery, creating a high risk for falls and serious injury. A safe and effective ground-level inspection can provide a wealth of information.
Gather Your Tools
A few simple tools can make a ground-level inspection much more effective. These include:
- Binoculars: To get a closer, safer look at the roof surface and its components.
- Camera or Smartphone: To take extensive photos and videos for documentation purposes.
- Notepad and Pen: To take detailed notes of all observed damage.
The Perimeter Check: A Step-by-Step Guide
A systematic walk around the property is the best way to ensure all potential damage is noted.
- Inspect the Yard and Ground: Begin by walking the perimeter of the property. The most obvious evidence of roof damage is often found on the ground. Look for whole shingles, pieces of tile, or metal roofing material that may have been blown off during the storm. Note the location and quantity of any roofing materials found. Also, look for large fallen tree limbs. Even if a limb is now on the ground, its impact could have cracked shingles or damaged the underlying roof structure.
- Examine Gutters and Downspouts: Gutters are highly susceptible to storm damage. Look for sections that are dented, bent, sagging, or have pulled away from the house. A critical clue to look for is an accumulation of shingle granules—the coarse, sandpaper-like particles from the surface of asphalt shingles—in gutters or at the base of downspouts. A large quantity of these granules indicates that the shingles have suffered significant wear or impact damage from hail, which compromises their ability to protect against future sun and water damage.
- Assess Collateral Damage: Examine the home’s siding, window screens, and window casings. Dents, chips, cracks, or holes in these areas serve as “collateral damage” indicators. The presence of such damage strongly suggests that the roof was subjected to similar impacts from wind-driven debris or hail, even if the roof damage itself is not immediately obvious from the ground.
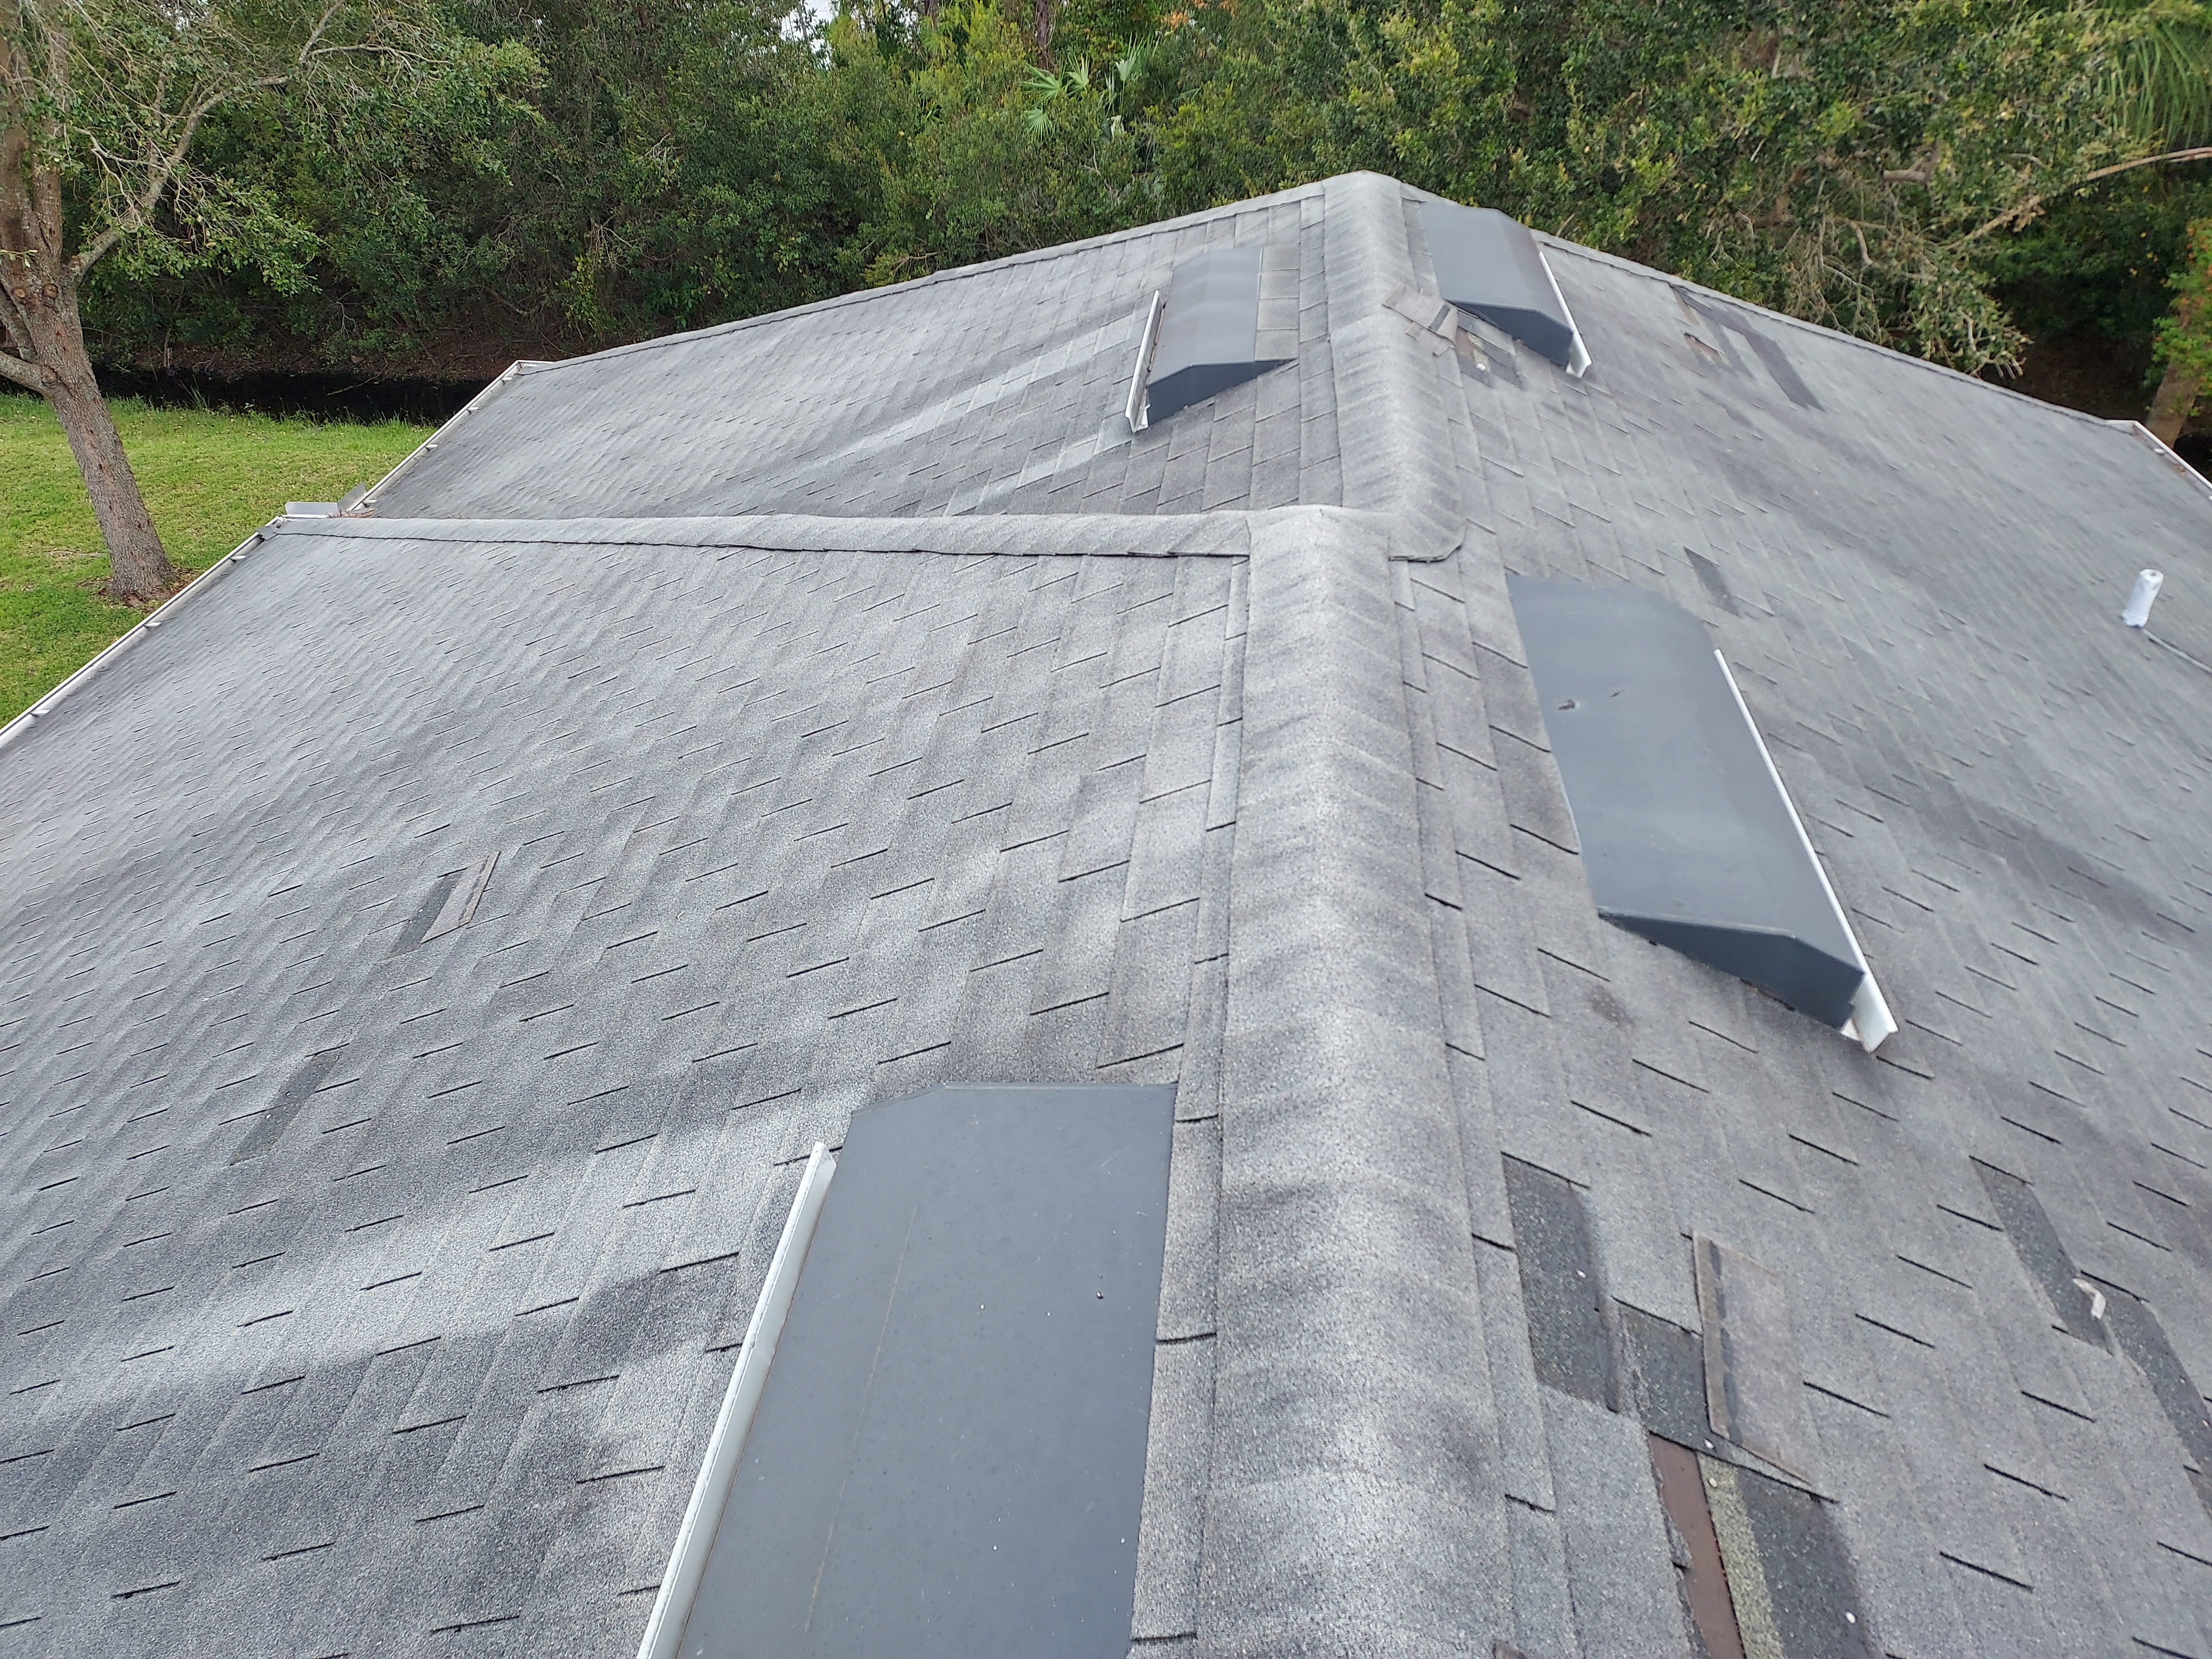
- Scan the Roof Surface with Binoculars: From a safe distance, use binoculars to carefully scan the entire surface of the roof.
- For Asphalt Shingles: Look for any shingles that are obviously missing, which will appear as dark patches on the roof. Also look for shingles that are cracked, torn, curled at the edges, or appear to be lifted or flapping. Hail damage may appear as dark “bruises” or circular patterns where granules have been knocked off.
- For Metal Roofs: Look for any dents, punctures, lifted panels, or missing fasteners.
- For Tile Roofs: Look for any tiles that are cracked, chipped, broken, or have slid out of place.
- Check Roof Protrusions: The areas where objects protrude from the roof are the most common points for leaks. Carefully inspect the flashing, which is the metal sealing material around chimneys, vents, and skylights. Look for any sections of flashing that appear bent, loose, detached, or missing.
To simplify this process for a homeowner under stress, the following checklist provides a scannable, actionable guide. A checklist format is more digestible than dense paragraphs, breaking down a complex task into manageable steps and reinforcing the value of the information. It is designed to be a practical tool that can be referenced on a mobile device while performing the inspection.
| Exterior Clues (From the Ground) | Interior Clues (From the Attic & Ceilings) | ||||
|---|---|---|---|---|---|
| Shingles/tiles on the ground | Water stains or discoloration on ceilings/walls | ||||
| Missing, cracked, or curling shingles | Musty, damp odors | ||||
| Dark spots or “bruises” on shingles (hail) | Visible mold or mildew growth | ||||
| Dented gutters, downspouts, or roof vents | Damp or wet attic insulation | ||||
| Shingle granules in gutter downspouts | Daylight visible through roof boards | ||||
| Loose or damaged flashing (metal around chimney/vents) | Peeling or bubbling paint near the ceiling | ||||
| Fallen tree limbs or large debris on the roof | Dripping sounds or active leaks |
Clues from the Inside: Detecting Hidden Leaks
Often, the most significant storm damage is not immediately visible from the outside. Water intrusion is a subtle and insidious problem that can cause extensive damage to a home’s structure and interior finishes long before it becomes obvious. A thorough post-storm assessment must therefore include a careful inspection of the home’s interior, particularly the attic and ceilings.
The Attic Inspection
The attic is the first interior space to show evidence of a roof leak. A safe and methodical attic inspection can reveal problems that would otherwise go unnoticed until major damage has occurred. When entering the attic, homeowners should use a powerful flashlight and, for safety, step only on secure wood joists or beams, never on the drywall of the ceiling below, which could be weakened by moisture.
Key signs of a roof leak in the attic include:
- Visible Water Stains or Trails: Look for dark stains or streaks on the underside of the roof decking (the plywood or OSB sheathing) and along the wooden rafters. These trails can often be followed “uphill” to pinpoint the area of the leak’s origin.
- Damp or Compressed Insulation: Wet insulation is a clear sign of water intrusion. It may appear darker in color, feel damp to the touch, or look compressed and matted down. Wet insulation loses its thermal properties and can become a breeding ground for mold.
- Mold or Mildew: The presence of mold, which may appear as black, green, or white fuzzy patches, is a definitive sign of a persistent moisture problem. A musty odor in the attic also points to hidden moisture and potential mold growth.
- Visible Daylight: On a bright day, turn off the flashlight and look for any pinpricks of daylight coming through the roof boards. Any visible light indicates a direct hole or gap in the roof system.
Ceiling and Wall Inspection
Damage evidence often makes its way from the attic into the main living areas. Homeowners should inspect the ceilings and upper portions of walls in all rooms, especially those on the top floor. Telltale signs include:
- Stains and Discoloration: Look for yellowish or brownish ring-like stains on ceilings or walls. These are classic signs of a slow, persistent leak.
- Peeling or Bubbling Paint: Moisture getting behind the paint layer will cause it to bubble, blister, or peel away from the drywall or plaster. This is often seen near the corners where walls meet the ceiling.
- Sagging Drywall: If a ceiling area appears to be sagging or bulging, it is likely saturated with a significant amount of water. This is a serious hazard, as the ceiling could collapse under the weight.
It is critical to understand that the location of an interior water stain does not necessarily correspond to the location of the leak on the roof. Water is subject to gravity and will follow the path of least resistance. It can enter through a damaged shingle, travel several feet along a rafter or the roof decking, and then drip onto insulation and drywall far from its original entry point. This principle of water travel highlights the inherent limitation of a simple visual check. A homeowner might patch the roof directly above a ceiling stain, believing they have solved the problem, while the true entry point remains unaddressed, allowing water to continue causing rot, mold, and structural decay within the roof assembly. This complexity is precisely why a professional inspection is necessary; an expert is trained to trace these hidden water paths back to their source and assess the full scope of both visible and concealed damage.
Building Your Case: A Step-by-Step Guide to Documenting Damage
After a storm, initiating an insurance claim can feel like a daunting task. However, the key to a smooth, fair, and successful claim process lies in thorough and methodical documentation. The evidence a homeowner gathers in the immediate aftermath of a storm is the foundation upon which their entire claim is built. This documentation serves not only the insurance company but also provides a crucial starting point for a professional roofing contractor to build a comprehensive repair plan.
Step 1: Photograph and Video Everything—Before You Move or Clean Anything
The single most important step is to create a detailed visual record of the damage as it was found. It is impossible to take too many photos.
- Establish Context with Wide Shots: Take photos of each of the four sides of the house to show the overall condition and the context of the storm’s impact.
- Capture Sections with Medium Shots: Photograph larger sections of the roof, walls, and property to show the distribution of damage.
- Detail with Close-Ups: Take clear, close-up photos of every specific point of damage. This includes individual cracked tiles, hail dents on metal flashing, torn shingles, and punctures from debris. Use a ruler or coin in the photo for scale when documenting hail impacts.
- Document Interior and Collateral Damage: Do not limit photos to the roof. Document all interior water stains, damaged ceilings, and affected personal belongings. Also, photograph “collateral damage” to gutters, siding, windows, and even damaged landscaping or outdoor equipment. This helps build a comprehensive picture of the storm’s severity for the insurance adjuster.
Step 2: Create a Written Damage Inventory
Supplement the visual record with a detailed written list. The homeowner should inventory all damaged items, both structural (e.g., “15 missing asphalt shingles on the west-facing slope”) and personal (e.g., “water-damaged ceiling fan in the master bedroom”). Including details like the item’s age, brand, or date of installation can be helpful.
Step 3: Make Only Necessary, Temporary Repairs
Homeowner’s insurance policies typically require the policyholder to take reasonable steps to mitigate further damage after a loss. This means if there is a hole in the roof, the homeowner should cover it with a tarp to prevent more rain from entering. However, it is critical that no permanent repairs are made until the insurance adjuster has had the opportunity to inspect the damage in its original state.
Step 4: Keep All Receipts
Every receipt related to the storm damage should be saved in a dedicated folder. This includes receipts for temporary repair materials like tarps, plywood, and nails, as well as any receipts for additional living expenses (ALE), such as hotel stays or meals, if the home is rendered uninhabitable by the covered damage.
Step 5: Contact the Insurance Company Promptly
As soon as it is safe to do so, the homeowner should contact their insurance agent or company to report the damage. This will officially start the claims process and they will be assigned a claim number, which should be kept for reference in all future communications.
This documentation process should not be viewed as a solitary task for the homeowner. Instead, it is the first step in a collaborative recovery effort. The photos and notes gathered by the homeowner provide a valuable baseline record. A professional contractor can then use this initial documentation as a starting point for their own, more detailed expert assessment. This partnership can be instrumental in strengthening an insurance claim, especially if the contractor identifies hidden or complex damage that the homeowner missed. By presenting the homeowner’s documentation and the contractor’s expert report together, a more complete and compelling case can be made to the insurance carrier, ensuring a fair and accurate settlement.
Making the Call: When You Need Emergency Help, Fast
Not all storm damage is created equal. While some issues can wait for a scheduled inspection and estimate, others constitute a true emergency that requires immediate professional intervention to prevent catastrophic secondary damage. A roofing emergency is any situation where the interior of the home is actively exposed to the elements or the roof’s structural integrity is clearly compromised. Recognizing these specific triggers is crucial for homeowners to protect their property and safety.
Call Immediately for Emergency Tarping
Emergency roof tarping is a critical temporary measure. It acts as a barrier to stop water intrusion until permanent repairs can be made, preventing further damage to insulation, drywall, electrical systems, and the home’s structure. The U.S. Army Corps of Engineers’ “Operation Blue Roof” program, which provides temporary coverings after major disasters, is based on this vital principle. A homeowner should call for emergency tarping services immediately if they observe:
- A Visible Hole or Puncture in the Roof: This could be from a fallen tree limb or other large debris and represents a direct conduit for water into the home.
- Large Sections of Missing Roofing: If significant areas of shingles or tiles are gone, exposing the black or brown underlayment or the wood decking beneath, the roof’s primary water-shedding layer is gone.
- An Active, Significant Leak: If water is actively dripping or flowing into the home’s interior during or after rainfall, immediate action is needed to stop the flow.
Call Immediately for an Urgent Professional Inspection
Some situations may not require immediate tarping but demand an urgent professional assessment due to high risk. A homeowner should call for an urgent inspection if they see:
- A Large Tree or Limb Resting on the Roof: The weight of the debris could be stressing the roof structure, and its removal requires professional expertise to avoid causing more damage.
- Visible Sagging or Bowing of the Roofline: Any noticeable dip or sag in the roof is a red flag for potential structural failure and must be assessed by an expert immediately.
- Widespread Damage: If a large percentage of the roof surface (e.g., more than 25%) appears damaged, it indicates a systemic problem that needs a comprehensive evaluation.
- A Leak Near Electrical Components: Water intrusion near a fuse box, electrical panel, or light fixtures creates a severe risk of electrical shock or fire and must be addressed as an emergency.
This section serves as the primary action point for a homeowner in distress. By clearly defining what constitutes an “emergency,” it provides specific, high-intent triggers. A person who identifies with one of these scenarios is no longer a casual browser; they are a highly motivated individual in need of an immediate solution. The clear, direct language is designed to address their urgent search queries and emotional state, making the call to action not just a suggestion, but a necessary next step for the safety and preservation of their home.
Your Partner in Recovery:
Why a Professional Inspection is Non-Negotiable
While a ground-level inspection by the homeowner is a crucial first step, it is not a substitute for a comprehensive assessment by a trained and qualified roofing professional. Attempting a DIY roof repair or relying solely on a personal inspection is a significant risk, both to personal safety and the long-term health of the home. A professional inspection is a non-negotiable step in the post-storm recovery process.
The Dangers of DIY and the Value of Expertise
The primary reason to hire a professional is safety. As emphasized by the Occupational Safety and Health Administration (OSHA), roofs that have sustained storm damage can be structurally unstable. Walking on a compromised roof can lead to falls or cause further damage to the structure. Professionals are equipped with the proper safety gear and training to navigate these hazardous conditions.
Beyond safety, a professional brings an expert eye capable of identifying damage that an untrained homeowner would likely miss. This includes:
- Hidden Damage: Subtle signs of hail damage, such as bruising or minor granule loss, or hairline cracks in shingles from wind uplift, are often invisible from the ground but can lead to serious leaks over time.
- Insurance Advocacy: A reputable contractor provides a detailed, evidence-based inspection report and a precise estimate using industry-standard software. This documentation is invaluable for the insurance claim. Many contractors will meet with the insurance adjuster on-site to walk the roof together, ensuring that all damage is properly identified and included in the claim, which can be critical for a fair settlement.
- Building Code Compliance: Following recent updates, the Florida Building Code has stringent requirements for roof repairs and replacements. A professional contractor is knowledgeable about these codes, ensuring that all work is performed to current standards, which is essential for the home’s safety and future insurability.
From Repairman to Consultant: The Role of a Modern Contractor
The role of a roofing contractor in a post-storm environment extends far beyond simply installing materials. They act as a professional consultant, guiding the homeowner through a complex and stressful recovery project. This includes managing the technical aspects of the repair, navigating the intricacies of the insurance process, and ensuring compliance with all legal and safety standards. This consultative role is what distinguishes a true professional from the “storm chasers”—unlicensed, often out-of-state operators who descend on disaster areas, perform shoddy work, and disappear, leaving homeowners with voided warranties and unresolved problems. Choosing a local, licensed, insured, and reputable company is a homeowner’s best defense against fraud and ensures a lasting, high-quality repair.
Conclusion
Navigating the aftermath of a Central Florida hurricane requires a calm, methodical approach. The process begins and ends with a focus on safety. By following a clear plan, homeowners can effectively manage the situation and protect their most valuable asset. The essential steps are to first ensure the area is safe from immediate hazards like downed power lines and gas leaks. Next, conduct a thorough but safe inspection from the ground, looking for both obvious and subtle signs of damage to the roof and surrounding property. Document every instance of damage with extensive photos and detailed notes to build a strong case for the insurance claim. Finally, and most importantly, recognize the signs of a true roofing emergency and call a professional for help.
A damaged roof is more than an inconvenience; it’s a breach in your home’s primary line of defense. Delaying action can lead to escalating problems, including severe water damage, dangerous mold growth, and compromised structural integrity.
Experiencing property damage can be overwhelming. Let an expert team take the stress off your shoulders. For a swift, professional response and a clear path to restoring your home and your peace of mind, contact Orange Contracting and Roofing for a free, no-obligation consultation and inspection.
Call Orange Contracting and Roofing at 407-205-2676 or email [email protected]
The company’s office is located at 105 Candace Dr., Suite 129, Maitland, FL 32751. Taking this step can help ensure a home is well-prepared to face the demands of the Central Florida climate for years to come.